Suzuki 800 Intruder Club & Forum
Welcome to suzuki800 Intruder forum

A UK Site Dedicated To The Suzuki C800, VL800, VX800, VZ800, VS800, C50, M50, Intruder / Boulevard / Marauder.

You will need to register before all the area's become visible, before doing so please enter & read the first thread in the Introductory area

It will only take a minute to register & it would be great to have you on board
This is a free to access and use site.
Suzuki 800 Intruder Club & Forum
Would you like to react to this message? Create an account in a few clicks or log in to continue.

Suzuki 800 Intruder Club & Forum

A UK Site Dedicated To The Suzuki C800, VL800, VX800, M800, VZ800, VS800, C50, M50 Model Intruder / Boulevard / Marauder
 
HomeLatest imagesRegisterLog in


 Home grown light bar install C50T

Go down 
+5
alfie92
captain crash
Mr Intruder
pledge
Farmboy
9 posters
AuthorMessage
Farmboy
Member


Home grown light bar install C50T Empty
PostSubject: Home grown light bar install C50T   Home grown light bar install C50T Icon_minitimeSat Oct 22, 2011 7:37 pm

After seeing how others have done their light bars with threaded rod and a few nuts, I thought I'd give it a try. This part will only be the physical install, I'll wire it soon.

Here's what I'm working with: 2 Grote security lights, nicely chrome plated and complete with 2-piece mounts. I also bought a few assorted nuts and washers. The hardware came to $4.00, the lights were around $24.00 each. The light on the left is turned around to show how the mount is attached.
Note also there's only a single wire. It's the power one. Ground (earth) is by mechanical connection.

Home grown light bar install C50T ORBMKejbVCQdjR3VuFLATrvOqEdPUohH

The first thing to do is remove the headlight shell, two screws does it. Disconnect the headlight plug then remove the nut holding each turn signal stalk. When you do this, put a piece of tape on one set of wires (there are two sets per turn signal) when you diisconnect the first signal. If not you run the risk of hooking up backwards eg: right is left, left is right. Minor annoyance but avoidable. Sorry for the blur, but I think you can pick out the greyish duct tape on the two wires.

Home grown light bar install C50T TaJ0v0PgDgGujpmjUBuNT0K6G0V2M9LE


The next thing was to check out the mount. Note that there is a slight hump to this. The idea being if you use this lower part (as I am), you tighten this down and the tension keeps it there. Nice idea, but not workable for this install as the turn signal is going vertical thru this hole. Home grown light bar install C50T LTosKHNQm6tAH4pTmqpC8O0sq0boHSiQ

Notice in the following two photos how it interferes with the nut/signal shaft before flattening. The second photo shows how it fits with no interference after a few surgical whacks with the 2 lb persuader...

This one shows how the bolt (photo purposes only as I'm using threaded rod of the same diameter) interferes with the nut

Home grown light bar install C50T LHf7amwOo1m5apNEKTGkjUaaRgpEJeqN

This shot is after flattening the mount. It now fits snugly even with the kit supplied spacer installed.

Home grown light bar install C50T DNeirUvOgET2IcmLFA53u5QT5ki85eKR

...another view

Home grown light bar install C50T UmBsNQ3F0wN2bLVdBAcmvBDt6dFGUmFh

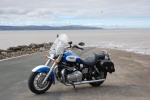
This is a mockup of how it's going to look on the front of the bike. Note it will mount vertically. I"ll post more when I get it attached to the front of the motorcycle. Comments/observations welcome.

Home grown light bar install C50T GnQdbDn7HpwjED7OwN5A3pFTIdTMhOT2

The install is going to proceed from left to right. Note the threaded rod (3/8") is left it's full length to be cut later. I've calculated thru trial and error that 7 3/4" out from outside of the turn signal mount is the right length for me. It gives me a small but adequate clearance between the turn signal and fork tube.

Home grown light bar install C50T NroIQfmpgF3EkfaGBF6HS7lD6nwn4eJN

A little detail is in order. Note that I'm using a 2" coupling nut, jammed with a regular 3/8" hex nut. This coupler nut is not necessary as 2 - 3/8" nuts will do the same job, but massive impresses me. I saw this done on another thread and think it's a good idea. On the other
side of the signal mount are three regular 3/8" hex nuts jammed against the mount. They measure out to 1" wide. I could have used a coupling
nut, but if 1 is good, 3 must be better! It's barely noticeable. I'll probably cover it with a small piece of wire loom to complete the look.
After this 1" of nuts are the additional 6 3/4" that make up the rest of the light/signal mount with washers applied at all mating nut/surfaces. A 3/8" chrome acorn nut finishes off the end piece.

Home grown light bar install C50T RDsbTRi6NiIIW56bewoHfase2kwQjQwu

Here is the mount in it's finished form. I used a hacksaw to cut the rod to the same length as the other side so all should match up. Looking at
one side from the inside out it goes (for both sides):

3/8" nut - 2" coupler nut - 3/8" washer - signal mount - washer - 3 3/8" nuts - washer - light mount - kit spacer - light mount - washer - acorn nut = 7 & 3/4".

Home grown light bar install C50T KGR9M9f7WariD6AqLfi5VJU740TFWoFT

The finished mechanical install. Wiring is next.

Home grown light bar install C50T Sb69RmCeOM83lcMqKbHuA1mfeBQJsgdc

Home grown light bar install C50T FMcBuB1lVmioMWadu1SFLFHKO5g2Dsfp

Home grown light bar install C50T E6RHnFEtge09MKnE7rqwGKagbnwtLrVl

See the attached drawing and additional photos. The drawcard to this type of light is the shallowness at the back as it doesn't interfere with any part of the windscreen. Incidentally, www.grote.com has a European site.

The light is part 64111, 35 watts. I'e included a couple of extra photos to show the rear clearance and mount assembly.

Home grown light bar install C50T URIFv3OquDWdUlBIMEVvSDs5NAnSTa9u

Home grown light bar install C50T EraPtdss5AERmkjPR5Dav5pDd5GqOolV

Home grown light bar install C50T U0saERHmk3UmlvltG47FK9QbNdm5Athr

Home grown light bar install C50T SpiD2qpIColhRMP8uO3bnSN8rJCwBUDu

I got a start on the wiring this evening, here are a couple of photos. Firstly, the components: Electrical connectors, 16g wire, relay, fuses and weatherproof inline fuse carrier.

Home grown light bar install C50T SVPueMa58bA0WGtf3IMJp3l6Q1cKffoW

I didn't see the need to remove the tank completely so I simply removed the passenger/rider seats and propped up the tank with a small can of
dubious contents...

Home grown light bar install C50T Ft1DiwwPiM2qr7ETQ40O5oGNkSvS8JnD

The only lead down here will be to the positive side of the battery leading to the relay. All I have connected are two negative leads for the cruise control. Even if I decide to ground the lights to the battery there should be no problems.

Home grown light bar install C50T Ouhq9IfvjKdhhdhvji38b2DPPmlIwLQF

This is the inline fuse holder. From what I've read on different sites, when coming off the battery, fused power lines should have the fuse as close to the battery as possible -- or practical. I've installed a round connector for the pole.

Home grown light bar install C50T COOt0DbaEm4hTUcuBv7ievTq8F1kWChI

The light baronly requires a spst (single pole single throw)relay, note that I'm using a spdt (double throw). It's no big deal. All it means is that I have the option of connecting two devices using post 87 and 87A. 87A is a closed circuit when no power is being applied. Don't use that connector and its essentially a spst. Can't think of any use for it, maybe switched led's when the key is off? Why do I have this type?
Didn't pay attention when I bought it. Guilty.

Home grown light bar install C50T K9wNGKSJjWL2T0JNKSKL7VJrWpBTO8JJ

The process of wiring up the lights is pretty straightforward -- even for me -- with one small exception. I wanted the lights interrupted during start up, same as the headlight so all current goes to the starter and is not shared by the lights. I found a very long, oft times very confusing thread(s) that all had their arguments/ideas/repetitions.
Eventually, I found that the wire required is a yellow one with a white stripe. This one in particular is in a rubber sleeve leading to a large yellow plastic connector from the left side of the handlebar, not too hard to find. As this photo shows, all I did was use a scotch-lock connector. I put a connector on the other wire to connect to the relay.
Everything worked fine.

Home grown light bar install C50T WeP9jomJKjaIRjARqmRHjUwqddQs7Que

I did not follow go back to battery for ground. It's probably good practice but it works fine this way too, at least for me. I used the ground for the relay switch from the oem white connector that's in the headlight shell. Use the black wire with white stripe if you do. So
why not use the connector directly to power your lights and forget about relays? I found a whole lot of posts that made reference to all the
current going thru the ignition switch and that it would eventually cause it to fail. Good enough for me. This explains the power coming directly from the battery.

My memory for number retention is poor (I had a real good time in the 70's) so I write things down. When it came to the relay, the embossed numbers were not super visible so I wrapped a piece of duct tape around the relay and wrote the contact numbers of the side. Made life a little easier.

Home grown light bar install C50T SclVtqwnlGst0k2qqvN1u8suESAlKDvE

So without further ado, here's how i wired my lights: 1) I connected the fused power wire from the battery to post #30. 2) The interrupt wire coming from the yellow wire/white stripe connects to post #86. 3) I connected the ground from the white aux connector in the headlight shell to post #85. I did not go back to the battery and did not wire the lights to ground. 4) I joined the two power leads from the two lights together and connected to post #87.

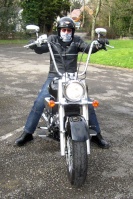
And this is how it ended up...

Home grown light bar install C50T DcAR0TUmreqWWN5DS1PwnEARDt4S54b4

thanks for looking in. Hope it was of interest. Comments and observations welcome.
Back to top Go down
pledge
Valued Member
pledge


Home grown light bar install C50T Empty
PostSubject: Re: Home grown light bar install C50T   Home grown light bar install C50T Icon_minitimeSat Oct 22, 2011 7:58 pm

So far so good interested in seeing the finished item.Home grown light bar install C50T 184121345
Back to top Go down
Mr Intruder
Suzuki800.com Founder ... & ... Senior Administrator
Mr Intruder


Home grown light bar install C50T Empty
PostSubject: Re: Home grown light bar install C50T   Home grown light bar install C50T Icon_minitimeSun Oct 23, 2011 9:35 am

Brilliant write up as usual Farmboy Home grown light bar install C50T 1237024881

What size are the lights you have used are they the 5.25" ones?

We don't have Grote in the UK so knowing the size of them may help others choose an appropriate sized alternative.
Back to top Go down
pledge
Valued Member
pledge


Home grown light bar install C50T Empty
PostSubject: Re: Home grown light bar install C50T   Home grown light bar install C50T Icon_minitimeSun Oct 23, 2011 4:19 pm

They look great very good job.
Back to top Go down
captain crash
Mentally Deficient lunatic ..... & ..... Site Moderator
captain crash


Home grown light bar install C50T Empty
PostSubject: Re: Home grown light bar install C50T   Home grown light bar install C50T Icon_minitimeSun Oct 23, 2011 7:10 pm

What a great idea & how incredibly cheap that is compared to a shop bought one Home grown light bar install C50T 103551

I think when the price is taken in to consideration you have/are doing an excellent job as it looks great Home grown light bar install C50T 1710857839
Back to top Go down
alfie92
Very Valued VIP Member
alfie92


Home grown light bar install C50T Empty
PostSubject: Re: Home grown light bar install C50T   Home grown light bar install C50T Icon_minitimeMon Oct 24, 2011 11:27 pm

Excellant write up and job,well done.
Back to top Go down
nigj
Prospect
nigj


Home grown light bar install C50T Empty
PostSubject: Re: Home grown light bar install C50T   Home grown light bar install C50T Icon_minitimeThu Oct 27, 2011 4:43 pm

Nice pice of work, looks good as well. I might use your idea on my own bike. Have to admit that those lights makes a great improvement when it comes to the bikes appearance.

Nils G Home grown light bar install C50T 2170595768
Back to top Go down
Farmboy
Member


Home grown light bar install C50T Empty
PostSubject: Re: Home grown light bar install C50T   Home grown light bar install C50T Icon_minitimeThu Oct 27, 2011 10:44 pm

Thanks for the nice words everybody. For the record, I don't claim originality. This mod is a merging of two or three threads using ideas from each. Just thought it'd be nice for this site to have a 'home' build like this to go along with any internet links. I'll hopefully get the relay/wiring done by the weekend.
Back to top Go down
Mr Intruder
Suzuki800.com Founder ... & ... Senior Administrator
Mr Intruder


Home grown light bar install C50T Empty
PostSubject: Re: Home grown light bar install C50T   Home grown light bar install C50T Icon_minitimeSun Oct 30, 2011 3:25 pm

The responses below Farmboys instructions on this mod that are above this but below the post will be slightly out of sinc as I have cut the various posts that make up Farmboys instructions and put it all together as one continuing post
Back to top Go down
Mr Intruder
Suzuki800.com Founder ... & ... Senior Administrator
Mr Intruder


Home grown light bar install C50T Empty
PostSubject: Re: Home grown light bar install C50T   Home grown light bar install C50T Icon_minitimeSun Oct 30, 2011 3:27 pm

Brilliant writeup Farmboy from the very start to the finish and very handy to know how you wired in to the headlight for maximum power to the starter during startup. Looks Brilliant, very well don, a credit to you Home grown light bar install C50T 276246
Back to top Go down
pledge
Valued Member
pledge


Home grown light bar install C50T Empty
PostSubject: Re: Home grown light bar install C50T   Home grown light bar install C50T Icon_minitimeSun Oct 30, 2011 5:11 pm

Great job and write up from start to finish.Home grown light bar install C50T 184121345
Back to top Go down
Farmboy
Member


Home grown light bar install C50T Empty
PostSubject: Re: Home grown light bar install C50T   Home grown light bar install C50T Icon_minitimeWed Nov 02, 2011 11:11 pm

Having used the light setup for a few days I offer the following adjustments that I will be applying to this build/mod. Though I don't require it, in order to effect horizontal aiming of the lights in this particular type of setup, the next time I would grind or file an oval shape to the holes where the rod goes thru the light mounts...just as a precaution so I'm not potentially blinding oncoming traffic. Secondly, I will be installing an on/off switch to allow me manual control. As wired right now, they are on when the bike is on (except for startup). My thought is to install it out of sight on the bottom of the PAIR valve cover, a low profile on/off round rocker. That way, if I ever remove the lights, the switch will be out of sight and she'll look stock. I saw a bat handle switch mounted on the rear of the headlight shell. No thanks. It would always be on, but could be switched off for whatever reason.
Back to top Go down
captain crash
Mentally Deficient lunatic ..... & ..... Site Moderator
captain crash


Home grown light bar install C50T Empty
PostSubject: Re: Home grown light bar install C50T   Home grown light bar install C50T Icon_minitimeTue Nov 08, 2011 3:40 pm

Very clever mod Farmboy, well explained and detailed Home grown light bar install C50T 276246 Home grown light bar install C50T 2170595768
Back to top Go down
lkwdc50b
Newbie
lkwdc50b


Home grown light bar install C50T Empty
PostSubject: Re: Home grown light bar install C50T   Home grown light bar install C50T Icon_minitimeMon Nov 21, 2011 9:13 pm

Nice write up, planning on this for upcoming mod. Thanks!
Back to top Go down
Bluesman
Very Valued VIP Member
Bluesman


Home grown light bar install C50T Empty
PostSubject: Re: Home grown light bar install C50T   Home grown light bar install C50T Icon_minitimeMon Nov 21, 2011 9:32 pm

Impressive Home grown light bar install C50T 2170595768
Back to top Go down
toddh01
Prospect
toddh01


Home grown light bar install C50T Empty
PostSubject: Home grown light bar install C50T   Home grown light bar install C50T Icon_minitimeTue Sep 18, 2012 6:48 pm

Farmboy, thanks for such a detailed post. I just completed the light bar on my 2006 C50T. It came out perfect and saved me a bunch of $$. Keep up the great work and thanks again.
Back to top Go down
Sponsored content


Home grown light bar install C50T Empty
PostSubject: Re: Home grown light bar install C50T   Home grown light bar install C50T Icon_minitime

Back to top Go down
 
Home grown light bar install C50T
Back to top 
Page 1 of 1
 Similar topics
-
» Tony's C50T * Screen Mounted Spot Lights*
» Brake light modulator on C50T
» Screen Mounted Spot Light Project on C50T
» Home built spot light bracket with measurements. Suzuki M50 / M800
» My brake light works, but my tail light does not function..

Permissions in this forum:You cannot reply to topics in this forum
Suzuki 800 Intruder Club & Forum :: The Garage :: Lighting & illumination.-
Jump to:  
Slide Show
A random selection of suzuki800.com member bikes.
Latest topics
» 12inch apes
Home grown light bar install C50T Icon_minitimeby Mbroom21 Tue Apr 16, 2024 12:54 pm

» Aye what's happenin'?
Home grown light bar install C50T Icon_minitimeby 717RedRumBob Fri Apr 12, 2024 6:50 am

» Handle bars rotation for comfort
Home grown light bar install C50T Icon_minitimeby Badger Thu Apr 11, 2024 1:20 pm

» Hello!
Home grown light bar install C50T Icon_minitimeby GregWidger Mon Apr 01, 2024 9:16 pm

» Hey to all
Home grown light bar install C50T Icon_minitimeby alongfortheride Tue Mar 26, 2024 9:41 pm

» Just saying hello as asked... plus a question.
Home grown light bar install C50T Icon_minitimeby SAM11206 Wed Mar 20, 2024 6:34 pm

» Hello!
Home grown light bar install C50T Icon_minitimeby Onigatudor Wed Mar 20, 2024 2:39 pm

» Choke plunger
Home grown light bar install C50T Icon_minitimeby flying1 Wed Mar 13, 2024 4:43 pm

» Hello intruder people
Home grown light bar install C50T Icon_minitimeby nano Tue Mar 05, 2024 2:19 pm

» Hi from North east England
Home grown light bar install C50T Icon_minitimeby Brianhuck Sat Mar 02, 2024 7:30 pm

» VX800 - Wiring issue colours & diagram?
Home grown light bar install C50T Icon_minitimeby Billybop90 Fri Mar 01, 2024 12:44 am

» Looking for a set of Leg wind deflectors for a C50 Boulivard.
Home grown light bar install C50T Icon_minitimeby Aikido789 Sat Feb 24, 2024 10:11 am

» Saying hello from Cheshire
Home grown light bar install C50T Icon_minitimeby bernard chaddock Wed Feb 21, 2024 4:58 pm

» ola de portugal
Home grown light bar install C50T Icon_minitimeby fabio almeida Tue Feb 20, 2024 9:28 am

» Hello from Texas
Home grown light bar install C50T Icon_minitimeby icoolwecool99@gmail.com Mon Feb 19, 2024 9:47 pm

» VX800 vacuum hose(s) 1996
Home grown light bar install C50T Icon_minitimeby Billybop90 Fri Feb 16, 2024 7:16 pm

» Chrome Fender Tips - Volusia VL800, Boulevard C50T
Home grown light bar install C50T Icon_minitimeby SWEET Fri Feb 16, 2024 6:25 pm

» New to the site
Home grown light bar install C50T Icon_minitimeby VAI777 Tue Feb 13, 2024 3:32 pm

» oldies but goldies
Home grown light bar install C50T Icon_minitimeby redevil Tue Feb 13, 2024 10:59 am

» My new M800
Home grown light bar install C50T Icon_minitimeby Urko Sun Feb 11, 2024 11:12 am

Log in
Username:
Password:
Log in automatically: 
:: I forgot my password